Configuring OpenVPN
Configure OpenVPN server and client services on FreeCORE.
OpenVPN server and client services are available in FreeCORE 15.0-U1.4 and 15.1-RC1, alongside WireGuard. These instructions use the 15.0-U1.4 interface. Restoring the service does not recover configurations removed by an earlier FreeCORE version. Configure the service before enabling it.
About OpenVPN
A virtual private network (VPN) is an extension of a private network over public resources. It allows remote clients on a public network to access a private network via a secure connection. FreeCORE provides OpenVPN as a system level service that provides VPN server or client functionality. FreeCORE uses a single TCP or UDP port to act as a primary VPN server. This allows remote clients access to data stored on the system. VPN integration is possible even if the system is in a separate physical location, or only has access to public networks.
Obtaining a Public Key Infrastructure (PKI)
Public key infrastructure (PKI) must be in place before configuring FreeCORE as either an OpenVPN server or client. PKI utilizes certificates and certificate authorities created in or imported to FreeCORE.
Configuring OpenVPN: Process Overview
The general process to configure OpenVPN (server or client) on FreeCORE is to:
- Select the networking credentials
- Set the connection detail
- Choose any additional security or protocol options
Configuring OpenVPN Client
Go to the Services page and find the OpenVPN Client entry. Click Configure to open the service settings.
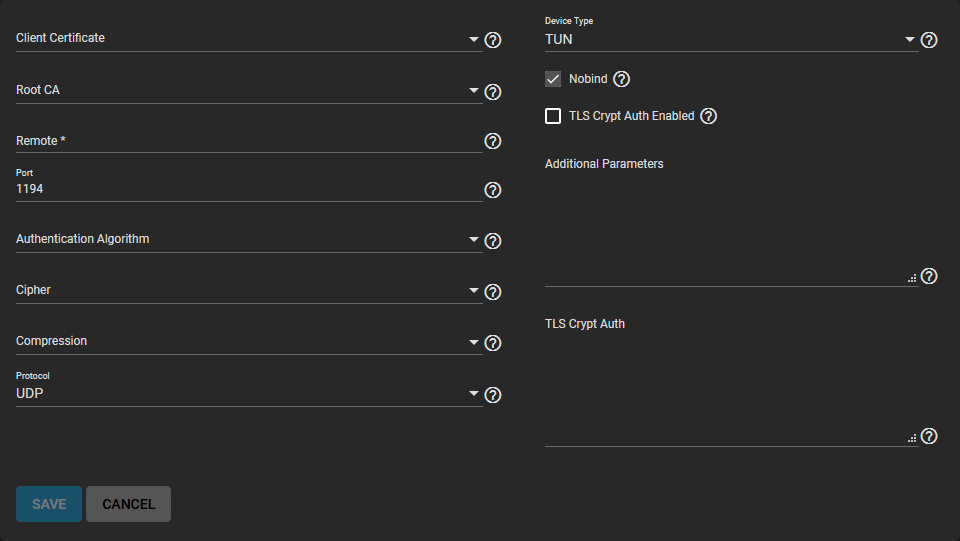
Choose the certificate to use as an OpenVPN client. This certificate must exist in FreeCORE and be in an active (unrevoked) state.
Enter the host name or IP address of the Remote OpenVPN server.
Select any other connection settings that fit with your network environment. Check for performance requirements. The Device Type must match with the OpenVPN server Device Type. Nobind prevents using a fixed port for the client. Enabled by default, it allows the OpenVPN client and server to run at the same time.
Review the Security Options and select settings that meet your network security requirements. Determine if the OpenVPN server is using TLS Encryption. If so, copy the static TLS encryption key and paste into the TLS Crypt Auth field.
OpenVPN Server
Go to the Services page and find the OpenVPN Server entry. Click Configure to open the service settings.
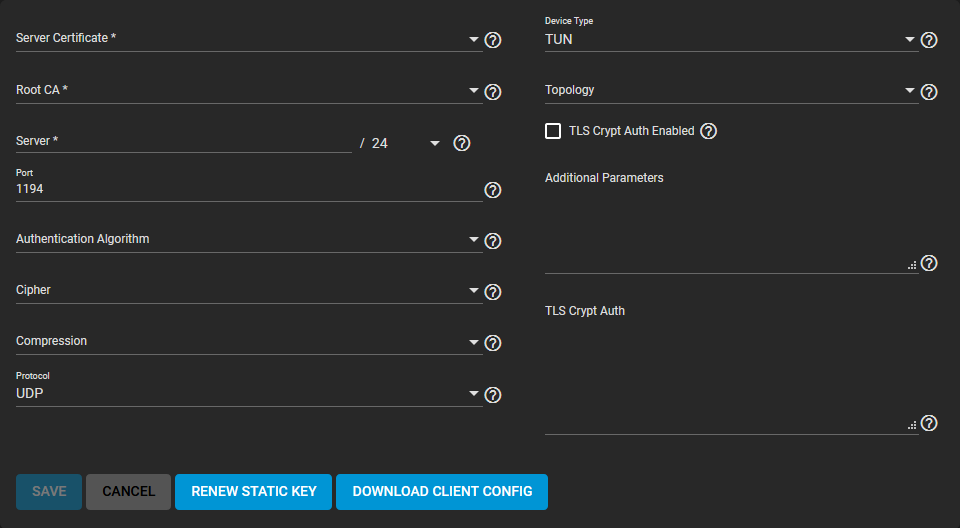
Choose a Server Certificate for this OpenVPN server. This certificate must exist in FreeCORE and be in an active (unrevoked) state.
Choose a tunnel network that does not overlap your existing networks. Enter these values in Server. Continue to select the remaining Connection Settings that fit with your network environment and performance requirements. When selecting TUN in Device Type, you can select a virtual addressing method for the server in Topology. Options are:
- NET30: Use one /30 subnet per client in a point-to-point topology. Designed for use when connecting clients are Windows systems.
- P2P: Point-to-point topology. Points the local server and remote client endpoints to each other. One IP address given to each client. This is only recommended when none of the clients are a Windows system.
- SUBNET: The interface uses an IP address and subnet. One IP address given to each client. Windows clients need the TAP-Win32 driver version 8.2 or newer. TAP devices always use the SUBNET specified in Topology.
The Topology selection is automatically applied to any connected clients.
When TLS Crypt Auth Enabled is selected, FreeCORE generates a static key for the TLS Crypt Auth field after saving the options. To change this key, click RENEW STATIC KEY. Any clients connecting to the server need this key. Keys stored in the system database are included in a generated client config file. A good practice is to back up keys in a secure location.
Review the Security Options and choose settings that meet your network security requirements.
Configure and save your OpenVPN server settings.
Create or import a suitable client certificate and its private key on the FreeCORE server. Click DOWNLOAD CLIENT CONFIG and select that Client Certificate. Transfer the downloaded configuration securely to the connecting client. It contains certificate and private-key material; check the remote server address before importing it.
Connection Settings
See OpenVPN Screens for more information on the client and server settings.
Security Options
OpenVPN authenticates peers and encrypts traffic across public networks. Match the client and server settings, and keep encryption enabled.
- Authentication Algorithm: This is used to validate packets that are sent over the network connection. Your network environment might require a specific algorithm. Match the peer configuration. For AEAD ciphers such as AES-GCM, data-channel authentication is part of the cipher.
- Cipher: This is an algorithm to encrypt data packets sent through the connection. Keep data-channel encryption enabled. Verify the required ciphers for your networking environment. If there are no specific cipher requirements, AES-256-GCM is a good default choice.
- TLS Encryption: Selecting TLS Crypt Auth Enabled encrypts all TLS handshake messages. This adds another layer of security. OpenVPN server and clients share a required static key.
Leave Compression empty for new connections. See the OpenVPN manual for cipher negotiation, authentication, and compression compatibility.
Service Activation
When finished configuring the server or client service, click SAVE. Start the service by clicking the related toggle in Services. To check the current state of the service, hover over the toggle.
Start Automatically: Selecting this option starts the OpenVPN service whenever FreeCORE completes booting. The network and data pools must be running.