Updating FreeCORE
FreeCORE has an integrated update system to make it easy to keep up to date.
Updates and Trains
FreeCORE updates are cryptographically signed and verified against the installed certificate for their train before they are applied. The train certificates are issued by the FreeCORE Update CA, and the update server is updates.freecore.org.
Moving from TrueNAS CORE 13.3 or 13.0-U6.8? Follow Move from TrueNAS CORE 13.3 or 13.0 before the ordinary update instructions below.
Updates install into a new boot environment. Selecting an earlier boot environment from System > Boot returns the operating system and configuration stored with it, but does not rewind storage pools, user data, or every shared system dataset. An eligible in-place move from TrueNAS CORE 13.3 captures a persistent return covering the origin boot environment and matching .system and active-iocage state. It does not expire automatically; retained space is visible and removal is manual. Unrelated user datasets are not rewound. Review the migration guide before updating.
FreeCORE 15.0 uses the FreeCORE-15.0-STABLE train for tested production updates. The separate FreeCORE-15.1-STABLE train currently carries 15.1-RC8, a release candidate for evaluation. See Releases before changing trains.
Bug reports are welcome on the project tracker at codeberg.org/freecore/freecore/issues.
Prepare the System
We recommend performing updates when the FreeCORE system is idle, with no clients connected and no scrubs or other disk activity happening. Most updates require a system reboot. Plan updates around scheduled maintenance times to avoid disrupting user activities.
The update process does not proceed unless there is enough free space in the boot pool for the new update files. If a space warning displays, go to System > Boot to remove unneeded boot environments.
Save the Configuration File
A dialog to save the system configuration file appears before installing updates.
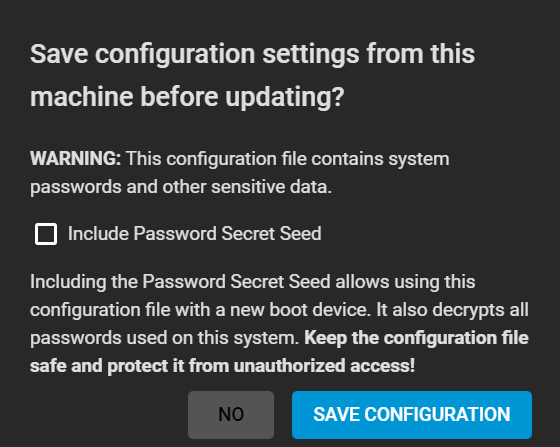
Important
Keep the system configuration file secure after saving it. The security information in the configuration file can grant unauthorized access to your FreeCORE system.
Update the System
Ensure the system is in a low-usage state as described above in Preparing for Updates.
Each update creates a boot environment. If the update process needs more space, it attempts to remove old boot environments. FreeCORE does not remove boot environments marked with the Keep attribute as shown in System > Boot. The upgrade fails if your system does not have space for a new boot environment. Space on the operating system device can be manually freed by going to System > Boot and removing the Keep attribute or deleting any boot environments that are no longer needed.
Manual Updates
You can manually download and apply updates in System > Update.
Each release's manual update file is linked from its entry on the FreeCORE changelog, beside the ISO.
FreeCORE manual update file names end with -manual-update.tar; the file carries the same signed manifest and packages the update train serves.
Download the desired update file to your local system. Log in to the FreeCORE web interface and go to System > Update. Click INSTALL MANUAL UPDATE FILE.
The Save Configuration dialog opens. You can save a copy of the current configuration to external media for backup in case of an update problem.
After the dialog closes, the manual update screen displays.
The current FreeCORE version displays for verification.
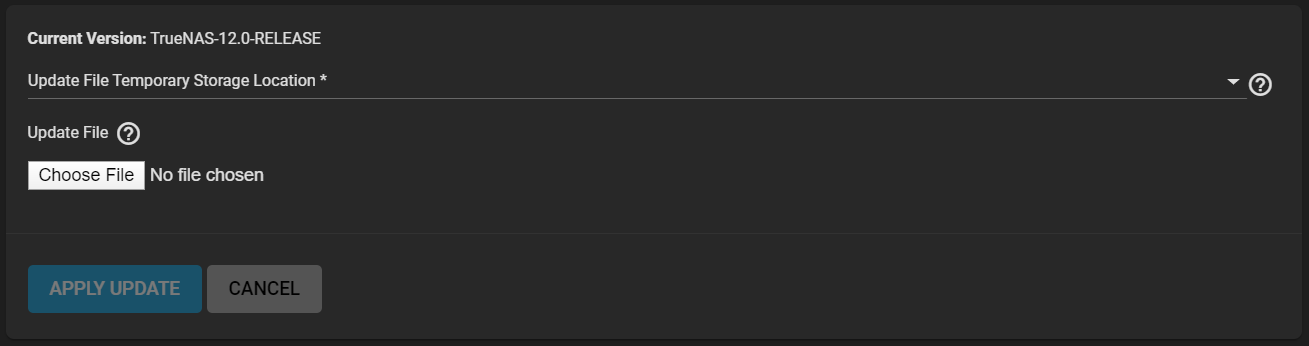
Select the manual update file saved to your local system using Browse. Set Reboot After Update to reboot the system after the update installs. Click APPLY UPDATE to begin the update.
Starting an update shows a progress dialog. When an update is in progress, the web interface shows an animated System Update icon in the top row. Dialogs also appear in every active web interface session to warn that a system update is in progress. Do not interrupt a system update.
Upgrade Via ISO
To upgrade FreeCORE to a new major version using an .iso file, use the Release List to download the .iso to the computer that prepares the installation media.
Burn the downloaded .iso file to a CD or USB stick. Refer to the Prepare the Install File instructions in the Installation article for tips about burning the .iso to media using different Operating Systems.
Insert the prepared media into the system and boot from it.
The installer waits ten seconds in the installer boot menu before booting the default option.
If needed, press Spacebar to stop the timer and choose another boot option.
After the media finishes booting into the installation menu, press Enter to select the default option 1 Install/Upgrade.
The installer presents a screen showing all available drives.
Important
All drives display, including boot drives and storage drives. Only choose boot drives when upgrading. Choosing the wrong drives to upgrade or install causes data loss. If you are unsure which drives contain the FreeCORE operating system, reboot and remove the install media. Log in to the FreeCORE web interface and go to System > Boot > ACTIONS > Boot Pool Status to identify the boot drives. More than one drive displays when using a mirror.
Highlight the drive where FreeCORE is installed and press Spacebar to mark it with a star. If using a mirror for the operating system, mark all the drives where the FreeCORE operating system is installed. Press Enter when done.
The installer recognizes earlier versions of FreeCORE installed on the boot drives and asks to either upgrade or do a fresh install:
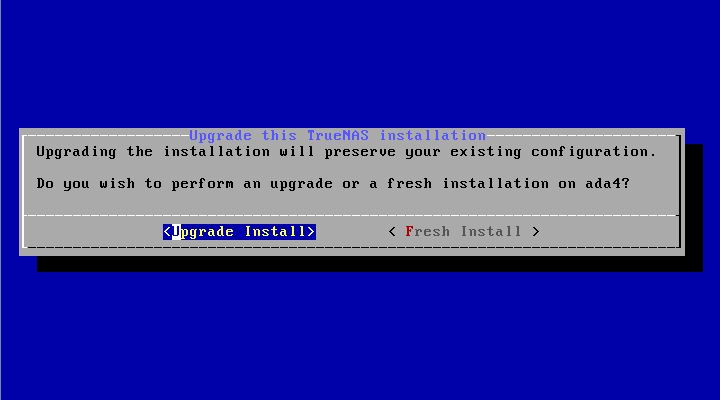
To perform an upgrade, press Enter to accept the default Upgrade Install. The installer displays another reminder that you should install the operating system on a disk you are not using for storage.
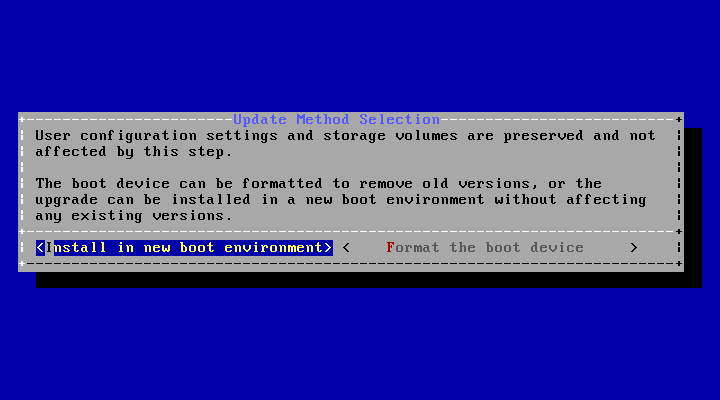
You can install the updated system in a new boot environment or format the entire operating system device to start fresh. Installing into a new boot environment preserves the old code, allowing a rollback to previous versions if necessary. Formatting the boot device is usually not necessary but can reclaim space. FreeCORE preserves user data and settings when installing in a new boot environment and formatting the operating system device. Move the highlight to one of the options and press Enter to start the upgrade.
The installer unpacks the new image and checks for upgrades to the existing database file. The database file that is preserved and migrated contains your FreeCORE configuration settings.
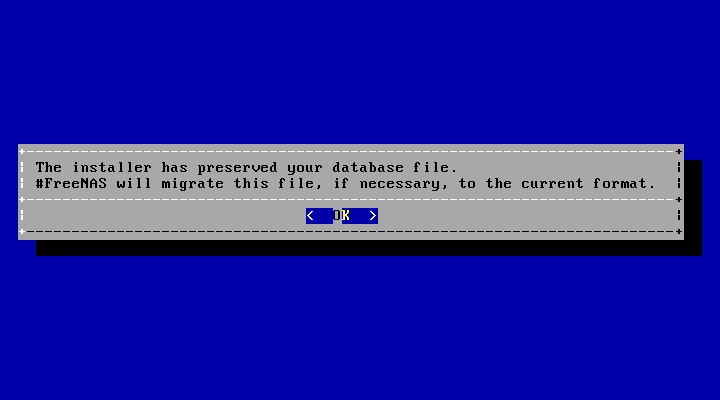
Press Enter.
FreeCORE indicates that the upgrade is complete and a reboot is required.
Press OK, highlight 3 Reboot System, then press Enter to reboot the system.
If the upgrade installer was booted from a CD, remove the CD.
During reboot, the previous configuration database can convert to the new version.
The conversion happens during the reboot Applying database schema changes line.
The conversion can take a long time to finish, sometimes fifteen minutes or more, and can cause the system to reboot again.
The system boots normally afterward.
If database errors display but the web interface is accessible, log in, go to System > General, and use the UPLOAD CONFIG button to upload the configuration backup you downloaded before starting the upgrade.
- 01
- Move from TrueNAS CORE 13.3 or 13.0 Enrol a TrueNAS CORE 13.3 or 13.0-U6.8 system on FreeCORE and upgrade it in place.
- 02
- Move to TrueNAS SCALE Take a FreeCORE system's configuration, applications and pools to TrueNAS SCALE, with a way back.
- 03
- Update Security Describes how FreeCORE updates are signed and verified.