Setting Up Users and Groups
Describes how to set up users and groups in FreeCORE.
Creating users and assigning them to groups allows you to efficiently tune permissions and share data for large numbers of users.
Note
Only the root user account can log in to the FreeCORE web interface.
When the network uses a directory service, import the existing account information using the instructions in Directory Services. Using Active Directory requires setting Windows user passwords inside Windows.
To see user accounts, go to Accounts > Users.

FreeCORE hides all built-in users by default. To see all built-in users, click Settings and SHOW.
Add a User
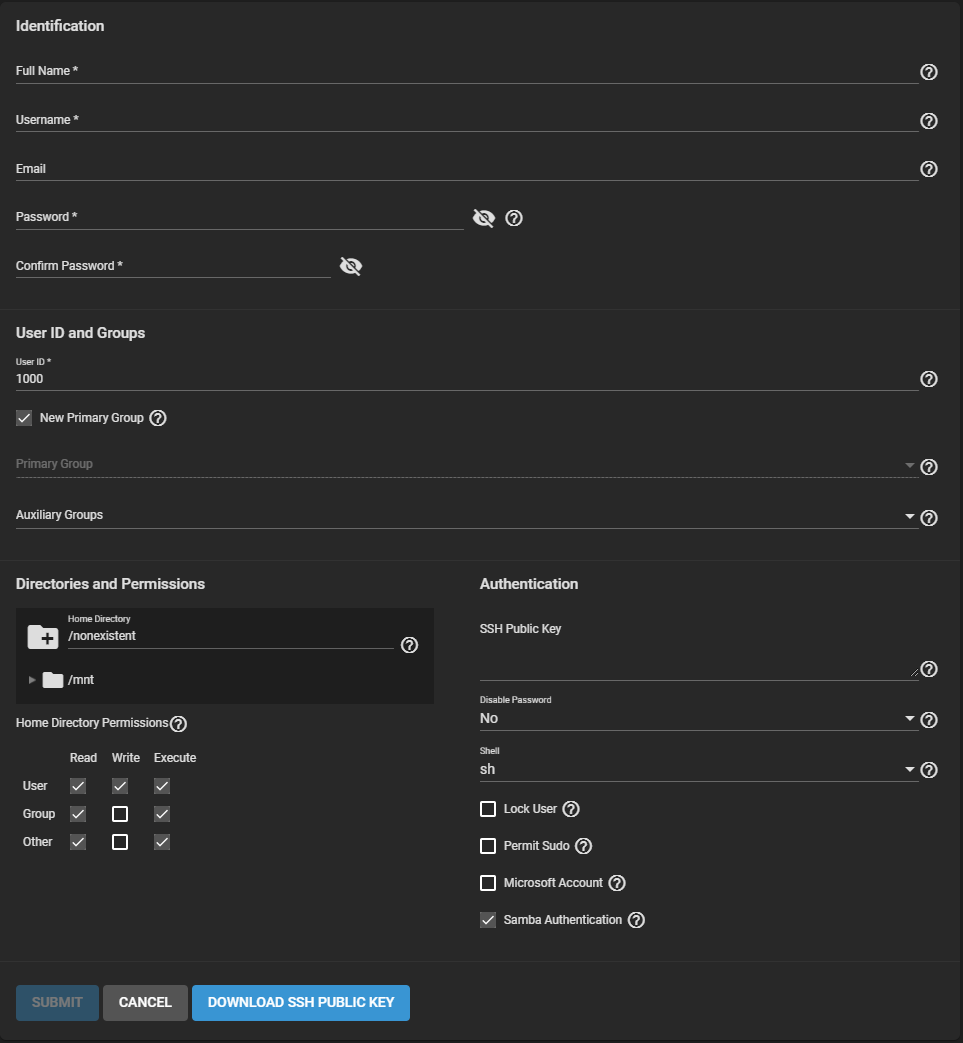
Go to Accounts > Users and click ADD.
Note
Fields with an * must be configured to submit or change the UI configuration.
FreeCORE subdivides account options into groups of similar options.
Identification
Enter a Full Name. FreeCORE suggests a simplified Username from the Full Name, but you override it with your own choice.
You can associate an Email address with a user account.
Set and confirm the user password.
User ID and Groups
Next, you must set a user ID. FreeCORE automatically suggests the user ID starting at 1000, but you can change it. We recommend using an ID of 1000 or more for non-built-in users.
By default, FreeCORE creates a new primary group with the same name as the user. To add the user to an existing primary group instead, unset New Primary Group and select a group from the Primary Group drop-down. You can add the user to more groups using the Auxiliary Groups drop-down.
Directories and Permissions
When creating a user, FreeCORE sets the home directory path to /nonexistent, which does not create a user home directory.
To set a home directory, select a path using the file browser.
If the directory exists and matches the user name, it sets as the user home directory.
When the path does not end with a subdirectory matching the user name, FreeCORE creates a new subdirectory.
The full path to the user home directory displays here when editing a user.
Directly under the file browser, you can set the home directory permissions. FreeCORE default user accounts cannot change their permissions.
Authentication
You can assign a public SSH key to a user for key-based authentication by pasting the public key into the SSH Public Key field.
If you are using an SSH public key, always keep a backup.
Click DOWNLOAD SSH PUBLIC KEY to download the pasted key as a .txt file.
When Disable Password is Yes, the Password field is unavailable. The system removes the existing password from the account and disables the Lock User and Permit Sudo options. The account cannot use password-based logins for services. For example, disabling the password prevents using account credentials to log in to an SMB share or open an SSH session on the system. By default, Disable Password is No.
You can set a specific shell for the user from the Shell dropdown:
Setting Lock User disables all password-based functionality for the account until you unset the option.
Permit Sudo allows the account to act as the system administrator using the sudo command.
For better security, leave this option disabled.
If the user account is accessing FreeCORE data using a Windows 8 or newer client, set Microsoft Account to enable additional authentication methods available from those operating systems.
By default, Samba Authentication is enabled. It allows users to access SMB share data using account credentials.
Groups
Using groups in FreeCORE is an efficient way to manage permissions for many similar user accounts. The interface lets you manage UNIX-style groups. If the network uses a directory service, import the existing account information using the instructions in Active Directory.
View Existing Groups
To see saved groups, go to Accounts > Groups

By default, FreeCORE hides built-in groups. To see built-in groups, click Settings and SHOW.
Add a Group
Go to Accounts > Groups and click ADD.
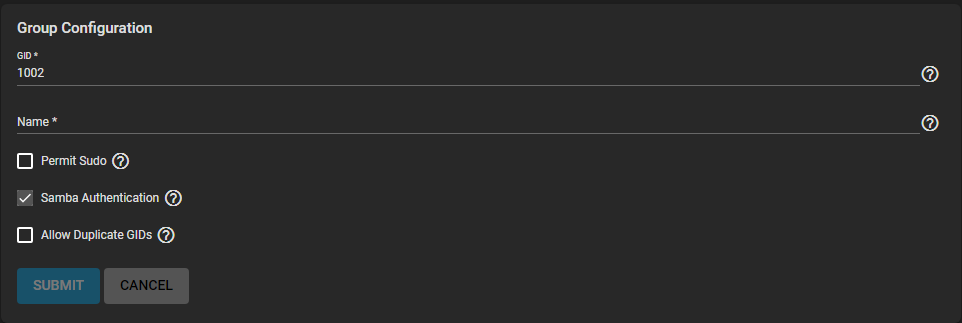
Each group gets a Group ID (GID). Enter a number above 1000 for a group with user accounts. You cannot change the GID later. Groups used by a system service must have an ID that matches the default port number used by the service.
Next, enter a descriptive group Name. Group names cannot begin with a hyphen (-) or contain a space, tab, or these characters: , : + & # % ^ ( ) ! @ ~ * ? < > =.
By default, the Permit Sudo option is unset. Setting it allows group members to act as the root account by using sudo. Leave Permit Sudo unset for better security.
Samba Authentication is set by default. It allows group members to use SMB permissions and authentication.
Finally, Allow Duplicate GIDs lets you duplicate group IDs but can complicate system configurations. We recommend leaving it unset.
Group Member Management
Register user accounts to a group to simplify permissions and access to many user accounts. To manage group membership, go to Accounts > Groups, click the Expand/Collapse Row for a group, then click Group MEMBERS:
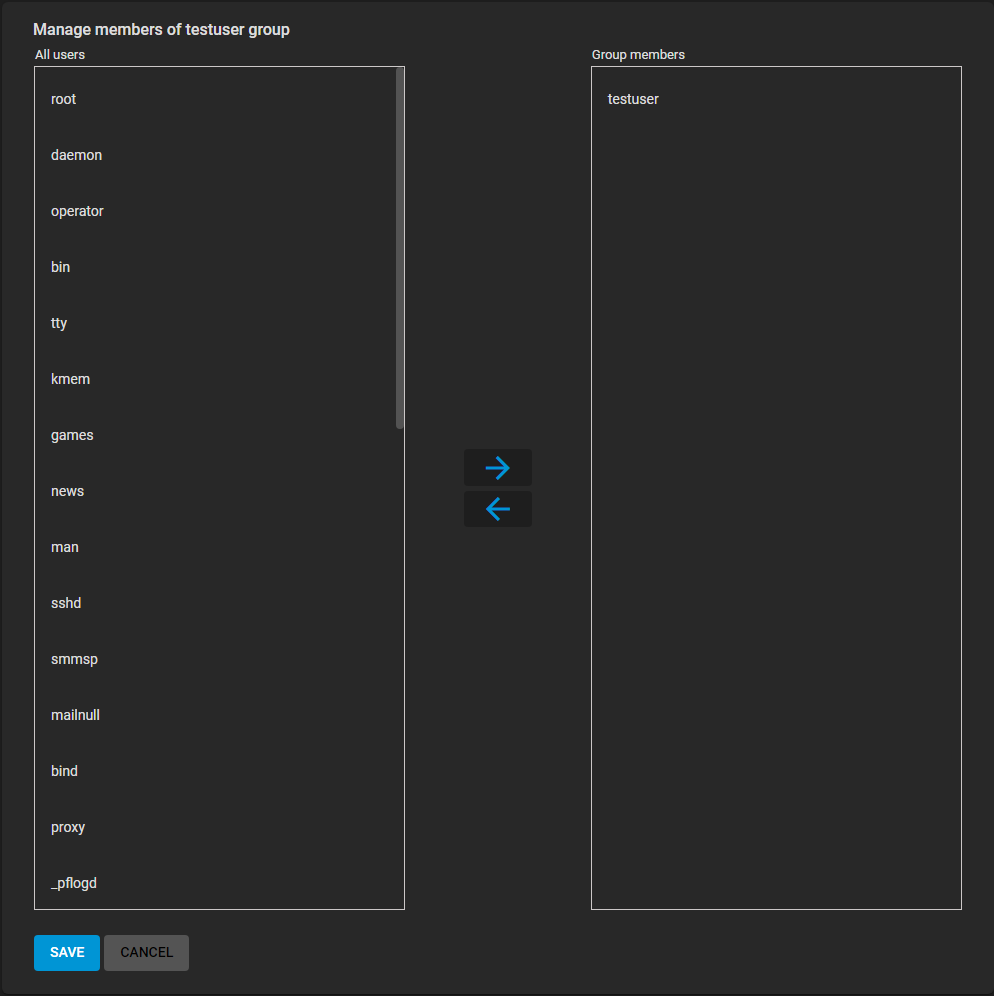
To add user accounts to the group, select them in All users and click . Select multiple users by holding CTRL while clicking each entry.