Setting Up NPIV
Describes how to configure NPIV on FreeCORE.
What is N_Port ID Virtualization (NPIV)
N_Port ID Virtualization (NPIV) is a Fibre Channel (FC) feature that allows multiple virtual N_Port IDs to share a single physical N_Port. An N_Port is a port that connects a Fibre Channel device, such as a server or storage array, to a Fibre Channel switch. It is responsible for establishing communication within the Fibre Channel fabric.
NPIV allows creating multiple virtual N_Ports on a single physical N_Port. This means a single physical Fibre Channel port can present multiple unique identities to the fabric, enabling different devices to share the same physical connection while maintaining separate communication channels. With NPIV, each virtual N_Port can have its own World Wide Port Name (WWPN) and can independently participate in the Fibre Channel network. This enhances resource utilization, improves management flexibility, and allows for better support of virtualization technologies. This is particularly useful in virtualized environments where you want to assign unique World Wide Names (WWNs) to each virtual machine, allowing for independent management of them on a storage area network (SAN) or on FreeCORE.
N_Port ID Virtualization (NPIV) and Virtual Machines
NPIV allows an administrator to use switch zoning to configure each virtual port as if it was a physical port in order to provide access control. This is important in an environment with a mix of Windows systems and virtual machines to prevent automatic or accidental reformatting of targets containing unrecognized file systems. It can also be used to segregate data; for example, to prevent the engineering department from accessing data from the human resources department. Refer to your switch documentation for details on how to configure zoning of virtual ports.
Creating NP Virtual Ports in FreeCORE
To create virtual ports on the FreeCORE system, go to System > Tunables and click ADD. Enter these options:
- Variable - Enter
input hint.isp.X.vports, where X is the number of the physical interface. - Value - Enter the number of virtual ports to create. The maximum number of target ports is 125 SCSI target ports, including all physical Fibre Channel ports, all virtual ports, and all configured combinations of iSCSI portals and targets.
- Type - Select loader. Reboot each node in HA.
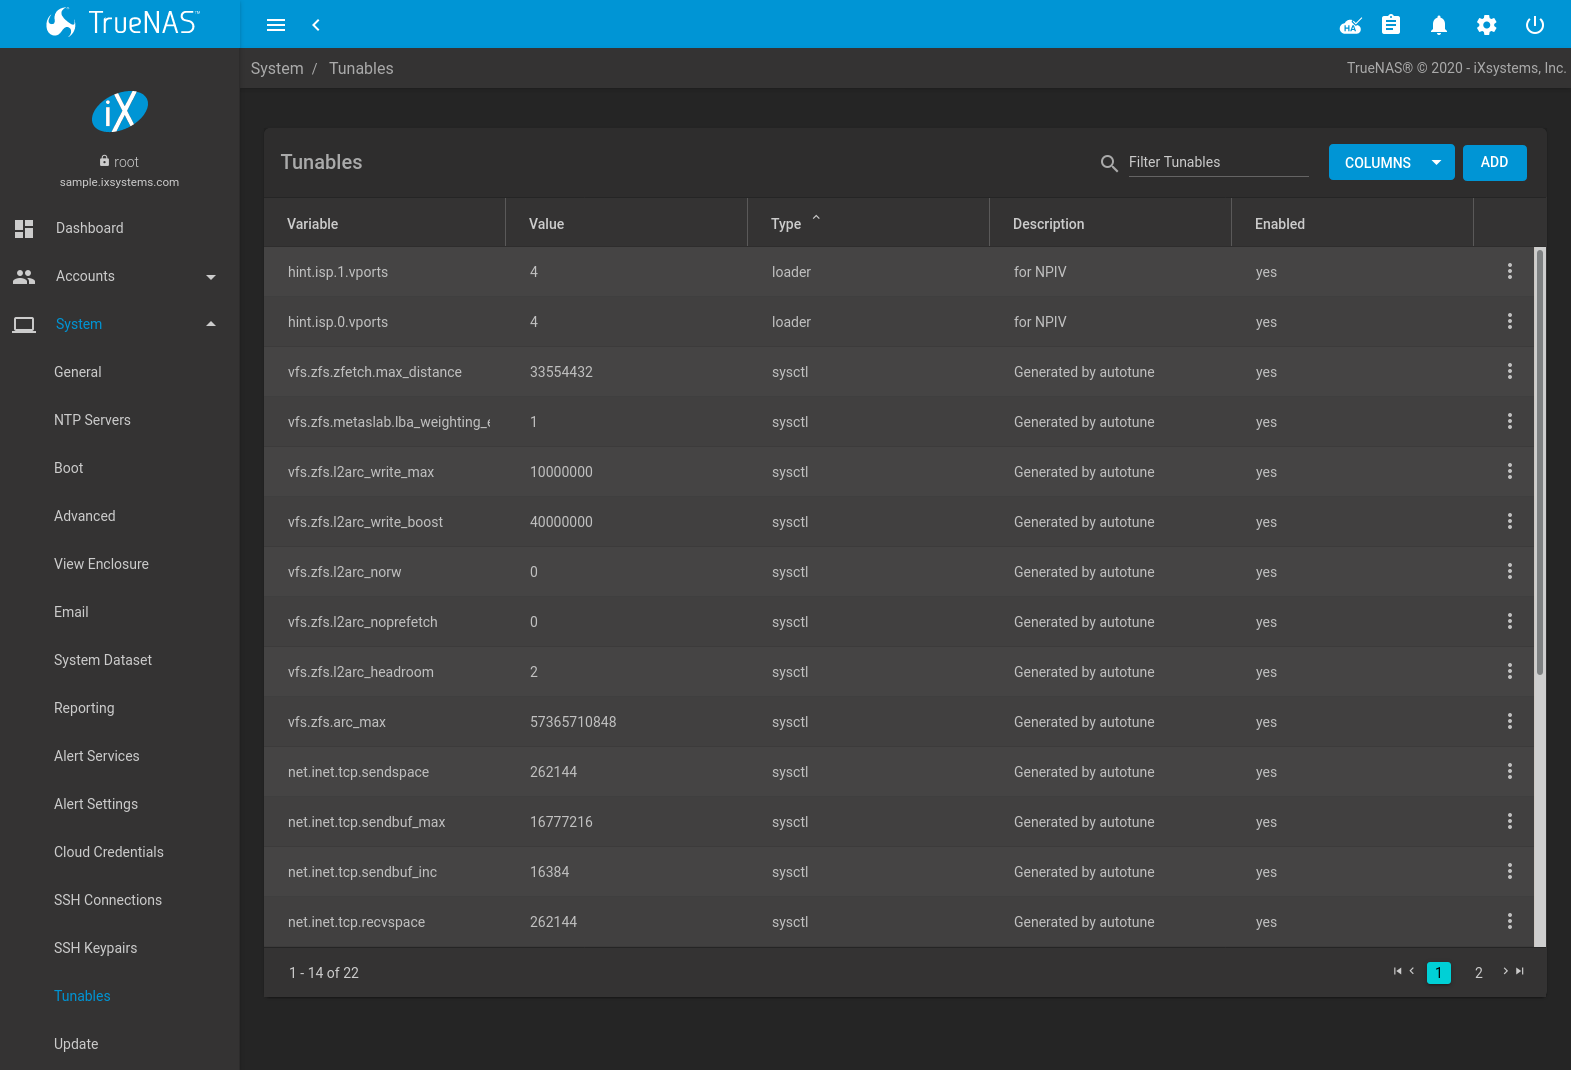
In the example shown:
- Two physical interfaces are each assigned 4 virtual ports.
- Two tunables are required, one for each physical interface.
After creating the tunables and rebooting, the configured number of virtual ports shows on Sharing > Block Shares (iSCSI) > Fibre Channel Ports screen so they can be associated with targets, and they are also advertised to the switch so zoning can be configured on the switch.
After associating a virtual port with a target, add it to the Target tab of Reporting so you can view its bandwidth usage.
Setting up NPIV with Fibre Channel
The following is a general guide on setting up NPIV with Fibre Channel in a Fibre Channel switch and a host system.
Prerequisites
- Hardware Support - Ensure the Fibre Channel Host Bus Adapters (HBAs) and switches support NPIV. Most modern FC equipment supports this feature, but it is always good to verify.
- Firmware and Drivers - Make sure your HBA firmware and drivers are up to date. NPIV functionality might require specific versions.
- Virtualization Platform - If using a virtualization platform (like VMware vSphere, Microsoft Hyper-V, etc.), ensure it supports NPIV and is properly configured.
Configuring NPIV on the Fibre Channel Switch
- Enable NPIV. Access the switch management interface (CLI or GUI).
a. Locate the NPIV settings, which are often found under port or global settings.
b. Enable NPIV on the switch. This might be a global setting or per-port setting depending on the switch model. - Configure zoning on the switch to include the WWNs of the virtual N_Ports. This is similar to how you would configure zoning for physical ports. Ensure that the zones include both the physical HBA port and the virtual WWNs.
Configuring NPIV on the Host System
- Access the HBA management utility (often provided by the HBA manufacturer) and enable NPIV on the HBA. This might involve setting the HBA to allow multiple WWNs.
- Assign virtual WWNs to each virtual machine using the management interface for the virtualization platform. Ensure that the virtual WWNs are unique and properly configured in the SAN zoning
- Configure the operating system within the virtual machines to recognize the virtual FC adapters. Install any necessary drivers or software to support FC connectivity.
Checking Connectivity
Verify that each virtual machine can see the storage devices it is zoned to access. Use monitoring tools to ensure that the NPIV setup is performing as expected and that there are no bottlenecks or connectivity issues.
Troubleshooting
- Check logs - Review logs on the switch, HBA, and host for any error messages related to NPIV.
- Verify zoning - Double-check the zoning configurations to make sure they are correct and include all necessary WWNs.
Refer to the documentation for your specific hardware and software for any additional configuration steps or troubleshooting tips. By following these steps, you should be able to set up NPIV with Fibre Channel successfully. If you encounter any specific issues, consult the documentation for your hardware and software or reach out to your vendor support for help.